


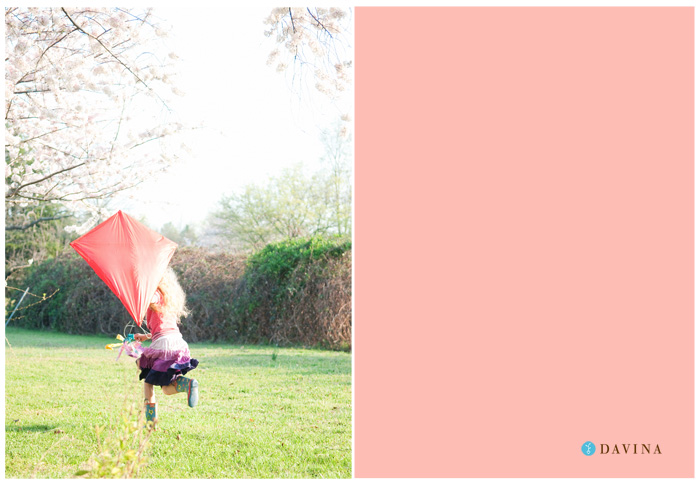
Make a kite.
 Davina
in Just for Fun, LOVE. LIFE. TIPS.
|
Davina
in Just for Fun, LOVE. LIFE. TIPS.
|
 6 Comments
|
6 Comments
|
 10 References
it's time to fly.
Over the weekend we decided to build some kites. I love the way they turned out and especially like when kites look homemade rather than look like a commercial. I found this tutorial online (which is excellent and easy to understand) but I wanted to have a more fun, colorful kite...so I changed a couple of things.
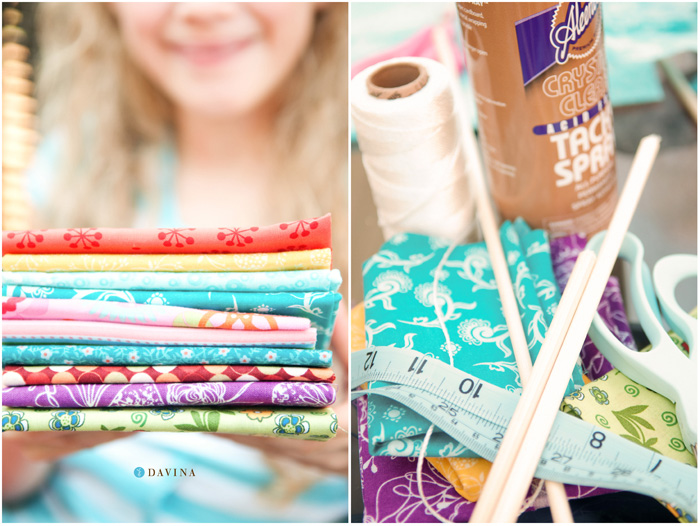
Supplies:
masking tape (we used blue painters tape because it was less boring than regular masking tape)
thin plastic tablecloth (the disposable kind you get for a party; pick a color-they are only $1.50 at walmart)
tape measure
roll of string
33"-1/8" wooden dowel
36"-1/8" wooden dowel
scissors
pocketknife
18" of cute 1 1/2" wide fabric (3-6 strips)
spray glue
Step 1:
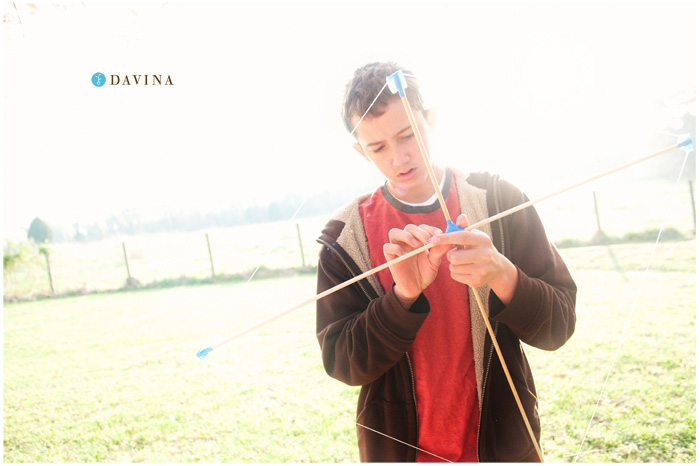
Make a mark 10" from the top of the 36" wooden dowel. Make a mark at the 16 1/2" mark (middle) of the 33" wooden dowel.
Lay the 33" dowel on top of the 36" dowel so the the two marks are touching and form a cross. Wrap the midpoint with masking tape until it the two pieces are held together.
To make the middle of your kite stronger where the two dowels meet use white string and wrap the middle tightly. Then wrap again with masking tape. (I think this is one of the hardest parts about building the kite. It's not too difficult you just have to keep at it until it feels pretty secure.)
Step 2:
Cut a notch at the end of each dowel. Make sure that you cut in the direction that string will go around the kite. In the video tutorial link above he says to do the notches first. I did that on my first kite and then it was almost impossible to line up all of the notches so that the string could run around the outside edge of the kite. I think it's easier to make the notches once you have the kite frame put together.
To make the notch place the dowel edge on a cutting board, using your pocketknife make a downward slice through the end going in the correct direction that the string will be able to wrap around the kite frame to make a diamond shape. Repeat until all four ends of have a notch.
Step 3:
Wrap string around the outside edge of the frame to form a diamond. To keep the string from falling off my kit frame I put a one inch piece of tape over the end of each dowel. Very tightly make a knot on the bottom end of the kite. Secure it with a 4" piece of tape then wrap the tape with more tape. it will add a little bit of weight to the bottom of the kite to that the kite will stay vertical.
Step four:
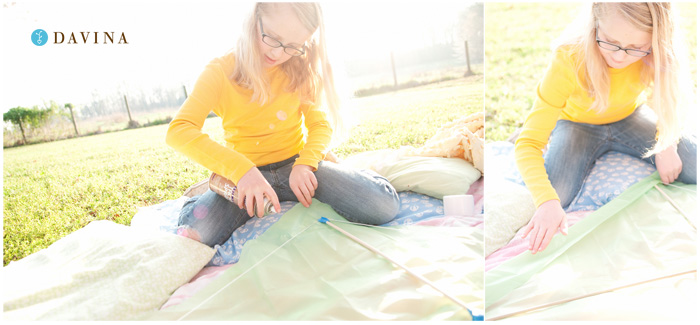
Lay the plastic tablecloth out on a flat surface and the place the awesome kite frame on the tablecloth. Cut around the kite frame leaving at least 1" of extra space between the edge of the kite frame and the cutting line.
Spray the glue along the extra 1" of space, wait for 20 seconds, lift and fold over the 1" piece of plastic tablecloth over the string frame of the kite. Repeat for each side of the kite (this gets really messy! you'll want to make sure you've placed your kite onto newsprint or something that the overspray of the glue won't ruin. If you put the kite on to newsPAPER the print will come off on the kite.
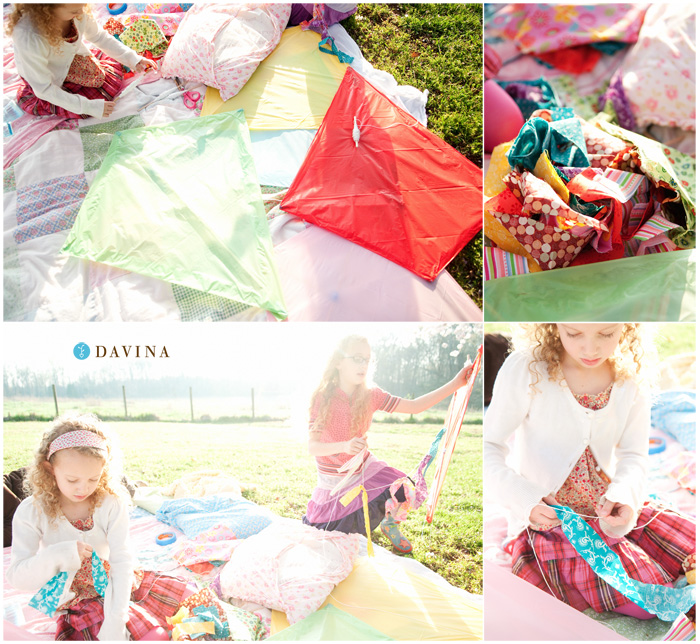
Step five:
Tie a 6' piece of string to the bottom of the kite frame. Tie pieces of coloful strips of fabric. The tail helps your kite to fly and be the right weight for the wind. If your kite won't stay up take a couple of strips of fabric off the kite, if it's getting whipped about by the wind you may want to add a couple of strips of fabric to the tail.
Step six:
Tie your kite flying string to the cross section (middle) of the kite frame. (We made our kite flying string from left over bits of dowel and just wrapped string around the middle of the dowel piece to create a way for each of the kids to have a way to fly their kites at the same time.)
Now you're ready to Go Fly a Kite!
*extra idea: we were thinking about making some cute designs for our kites (which may change their weight too much...we'll see) by making flowers or butterflies out of paper or cardstock and spray gluing them to the front of our kites to add to the happy factor.
good. LIFE.
References (10)
-
 Response: navigate hereExcellent Website, Stick to the very good work. Regards!
 -
Response: reduction en exclusiviteAlways loved making kites as a kid. So much fun!
-
Response: Repossession softwareDavina's Blog - Davina's Blog - Make a kite.
-
Response: Pro Repo repo softwareDavina's Blog - Davina's Blog - Make a kite.
-
Response: Pro Repo repo softwareDavina's Blog - Davina's Blog - Make a kite.
-
Response: invisible bracesDavina's Blog - Davina's Blog - Make a kite.
-
Response: invisible bracesDavina's Blog - Davina's Blog - Make a kite.
-
Response: forskolinDavina's Blog - Davina's Blog - Make a kite.
-
Response: relevant websiteDavina's Blog - Davina's Blog - Make a kite.
-
Response: best pain relieving creamDavina's Blog - Davina's Blog - Make a kite.

Reader Comments (6)
Davina,
How much fun! The kites looked great. The kids look like they had fun constructing the kites...so colorful and creative. Thanks for sharing.
Gramma Betsy
Davina,
How much fun! The kites looked great. The kids look like they had fun constructing the kites...so colorful and creative. Thanks for sharing.
Gramma Betsy
What a beautiful day; it looks like you guys made some great memories!
I have been researching this and I am really grateful for your information.
I have been researching this and I am really grateful for your information.
It looks like a great kite! I have to make a kite for a school project, do you mind telling me where you have bought the table cloth?